How to Create Your Nutrition Business Card

Has creating a business card been on your checklist for a while and you just haven’t gotten to the project yet?
Taking the time to prioritize creating a business card for your nutrition business will ensure that when any networking opportunities come your way, you’ll have a resource ready to share with any new potential leads!
The opportunity to share your business card are endless!
Shopping at the grocery store and striking up a conversation with someone new
Meeting a potential client at a dinner party
Pinning a few business cards up on your local coffee shop bulletin board
Passing one onto a colleague who might send referrals your way
Inside this blog post, I’m going to outline the exact steps to take to create your nutrition business card (for free!) using the graphic design program Canva, so you can take your nutrition business to the next level and start signing new clients now!

Getting Started in Canva
The first step you will want to take when creating your nutrition business card is to sign up for a Canva account.
Either the free or pro paid Canva account will work for this project, the difference being that the pro paid account allows you to have more template, font, and photo options to choose from.
But don’t worry, if you don’t want to pay for the pro account at this time, you can still use the free version to create your business cards!
Choosing Your Nutrition Business Card Template
Once you’re signed into Canva, use the search bar in the middle of the screen and type “business card” and hit enter.

You’ll be given lots of different pre-designed business card template options to choose from, but there are a few things you need to look for when choosing your template:
1. Choose a design that fits your style
Try to look for a design that feels good to you and is similar to your business branding.
You’ll be able to customize the fonts, colours, and pictures on each template, but it’s important to start out with a good foundation for your business card to save you time from having to completely rework the design!
2. Choose a free or paid template
Not all of the templates are free! If you’re using the free version of Canva, you’ll need to keep an eye out for templates without the little gold crown in the bottom right corner of the template.
This crown means that the template is only available to those who have pro paid version of Canva and will not be available for free users.

3. Look for templates that include multiple pages
To create a business card that has a design on the front and the back of the card, you’ll want to choose a template that includes multiple pages.
You’re probably wondering, “but how can I tell if a template has multiple pages?”
When you hover your mouse over a template, the number of pages will show in the bottom left hand corner of the template. For example, you can see in the photo below that this particular template has 3 pages.
It is possible to choose a template that is only one page and duplicate it so that the front and back of the business card are the same. But with business cards it’s best practice to have different designs on each side of the card.
Remember that your business card is a form of marketing, so I definitely recommend really showcasing your business and your brand by making sure the front and back of your card is full of helpful, useful information.

Once you’ve chosen your template, simply click on it and choose “Customize this template”. Canva will then open up the template into a bigger window where you can personalize the business card for your nutrition business!

How to Personalize Your Business Card
Now that you’ve chosen the template you want to use, it’s time to personalize it to match your nutrition business branding and relevant information!
Here are the steps to follow to personalize your nutrition business card:
1. Change the colours to match your brand
If you have the paid pro version of Canva, you can add your branding to the brand kit inside Canva, located on your Canva home page. This makes it really easy to find your branding when customizing and creating in Canva.
Haven’t chosen any brand colours yet? No problem!
By clicking the coloured square to the left of the word “Animate”, you will be able to see all of the colours and colour gradients available to you inside Canva.
The first colour you’ll want to change is the background of your business card. Play around with what you like best, but a white background is a great choice to be able to see everything on your card clearly.
Next you’ll want to change the colour of your font. Click down on your mouse beside your design and drag the cursor across all of the text on your card.
This will highlight everything and allow you to change the colour of all of your text at the same time (instead of having to do each section separately!)

2. Add your logo to the business card
Adding the logo for your nutrition business to your business card can help to create brand awareness and credibility for your business.
If you don’t yet have a logo, there are pre-made logo options available inside Canva or you can always have one created from a designer on Fiverr or Creative Market.
To add your logo to your business card:
Delete the logo and text from the template you’ve chosen
Click “Uploads” on the left hand side of Canva
Upload your logo to Canva
Once your logo uploads, either click it or drag it onto your template
At this point you will want to adjust, move, and resize your logo in a way that makes the most sense design-wise.
You’ll notice as you’re moving your logo around that Canva will show you dotted lines to help you to align your logo with different text on the business card. This can be really helpful when you want things to line up just right!
If you want to find the true center of your business card, adjust your logo until you see a solid purple line. This solid line can be used to find both the horizontal and vertical center of your business card.

3. Enter your business and contact information
The goal of giving out business cards is to market your business and attract new clients. But if you don’t tell them how to connect with you, then this strategy will never work!
So it’s important to make sure you add your business and contact information to your business card.
Some information that you can add to your business card includes:
Your name
Your professional designation or title
Your email address
Your website
Your social media handles
Optional: you can add your phone number and/or address if you’re comfortable doing so
To update this information on your business card in Canva, simple change, delete, and add the information applicable to you!
Many business cards include an element or graphic beside each line of information, such as a telephone beside a phone number, or the Instagram logo beside an Instagram handle.
To add graphics to your business card:
Click “Elements” on the left hand side of Canva
Search for the element you’d like to add (ex. a laptop to go beside your website)
Click on the element you like best to add it to your business card
Resize and reposition the element to fit your business card and match the size of the other elements
If you need to make any changes to your font size, you can do so by using the plus and minus buttons on the toolbar to make any adjustments. You can also drag your text to reposition it on your business card to your liking.

4. Design the back of your business card
Now that you have the front of your business card ready to go, you can start designing the back side.
I recommend taking advantage of all the space on your business card to market your business by adding something valuable to the back.
There are a couple of things you can add to the back of your business card:
You can add your logo, following the steps we covered above
You can add a QR code which redirects to your website, offer, etc.
Adding a QR Code to Your Business Card
Adding a QR code to your business card gives your ideal clients an easy way to connect with you. Instead of manually searching for your website or social media pages, they can just simply scan the code!
A QR code also gives you more control because you can direct your ideal clients where you want them to go, whether that be your website, your social media profile, or a landing page to sign up for your freebie (hint: this option is most ideal!)
Let’s walk through the steps you need to take to add a QR code to your business card:
Click on “Apps” in the left hand bar of Canva
In the search bar, type “QR code”
Click the first option that comes up called “QR code”

4. From here, enter the URL of the destination you want people to go to ie. your website URL, your Instagram URL, or the URL to your freebie landing page.

5. Click the “Generate Code” button to have your custom QR code populate onto your business card.
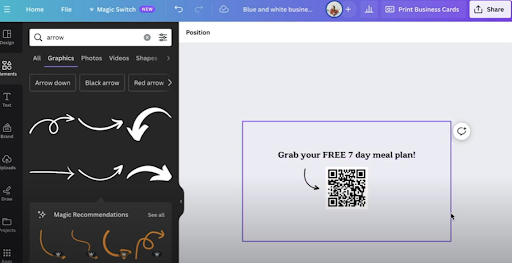
But don’t stop here! If you’re going to have a QR code on your business card, it’s a good idea to give people direction and explain why they should scan the code.
Add text to your business card by clicking “Text” on the left hand side of the screen in Canva, and add in some text describing why people should click your QR code.
Printing Your Business Cards Inside Canva
Now that your business card is designed and ready-to-go, it’s time to print them!
Canva has an amazing feature that allows you to order your business cards directly through the platform.
There are different order and price options depending on how many business cards you need, and Canva prints and mails them directly to your door.
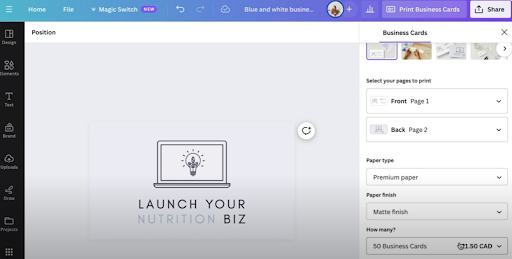
To order your business cards through Canva, click “Print Business Cards” at the top right hand corner of your screen.
From here you can choose:
The type of paper you want your cards printed on
The paper finish of your business cards
How many business cards you want to purchase
If you don’t want to use Canva to print your business cards, I recommend giving Vistaprint or Moo a try!
Resizing Your Nutrition Business Card
If you’ll be marketing your business at an event or tradeshow, it’s a good idea to not only your business cards on hand, but also something bigger and more tangible at your table for people to grab and take with them. This is where postcards come in.
To turn your business card into a postcard, all you have to do is click the “Magic Switch” button at the top left hand side of Canva and resize the card using the options provided or by choosing a custom size!

Doing this will change the look of your card so don’t forget to reposition your text and logo in a way that feels right to you and makes sense for the postcard.
Ready to take your nutrition business to the next level?
So there you have it, all of the steps to design your nutrition business card inside Canva, absolutely free!
Get those cards designed, printed and start handing them out and marketing your nutrition business today.
If you need more support with starting your nutrition business (without the overwhelm), grab a seat to my FREE workshop!